 WA9TT Amateur Radio Station
My One Ton Erector Set
I began thinking of a tower and Yagi antenna installation in January, 2013. As time passed, I discovered how many, many considerations go into such a massive undertaking! My understanding was rudimentary. As I spent months investigating and considering the practical & mechanical aspects of a 50' tower, I came to understand a great deal. This page shares my experiences.
I first only wanted a nice Yagi antenna, especially to enhance signal reception on 20 meters. In the end, I have four antennas:
- Force 12 C-3 seven-element Yagi for 20-15-10 meter amateur bands. I was convinced I was going to get a great Mosely tri-band antenna. Then a ham who has installed antennas in 30 states & in many Caribbean countries dissuaded me and highly recommended a Force 12. I had a hard time accepting that recommendation. Then I came across a landmark research paper, HF Tribander Performance--Test Methods & Results--2nd Edition and I was more than convinced!
- Next came along Rodney KDØEBT. He suggested a good 2 meter vertical to enhance my emergency preparedness. Well, the antenna choice was easy. For sure, a Diamond, and so I installed the X-700HNA.
- Lastly I spoke with FCARC club president Gary KB9AIT. He inspired me to consider the International Antenna Company's 80 meter & 40 meter double bazooka dipoles.
When one plans for a tower installation, there are many, many things to research, consider and decide upon. You have one chance to get it right before the day when the tower is erected.

- What kind of tower? Tilt-over, nested, free-standing?
- What wind speed & tower strength does one design for?
- What about safety from power lines?
- Do I need to get approval from the FAA?
- What about safety consideration from transmission radiation?
- What kind of strength is needed for a free standing tower very near my neighbor's house? You see, I had ONLY one place where that tower could go: next to my garage. And with my limited space, I could not erect a guyed tower. It had to be self-supporting.
- What tower company? I eventually decided on AN Wireless, an outstanding choice for a commercial grade tower.
- How can I get the tower economically transported from Ohio to my QTH? And once here, how can I get that big payload off the truck in 1/2 hour if the semi is parked on the road in front of my house? Just on this point, I considered eight alternatives!
- What kind of Yagi?
- How do I position the tower so a Yagi with a 20' turning radius doesn't hit nearby tree limbs?
- What about the mast?
- What kind of rotor?
- What kind of coax to minimize signal loss along a 160' route to my ham shack?
- What techniques should I use to route the cable down the tower leg? What about strain relief, and at what points along the descent from the tower?
- How should I efficiently route the five (including rotor) cables into my ham shack on the opposite side of the house?
- What about accounting for UV radiation on cable & plastic parts?
- What are good practices for tower, antenna & rotor grounding?
- What about attaching dis-similar metals for grounding the copper cable to each galvanized tower leg?
- Who is going to dig the hole and insert the tower sub-structure?
- What is rebar? How do I install that?
- How do I raise the tower, particularly for one that weighs 1,750 pounds?
- How to I safely & efficiently get the antennas installed?
- How does one POP rivet?
- What is proper tightening of the tower legs and braces? What about torquing? Just how much?
- How can I adequately align the tower on the ground so that it stands upright in the air?
- How do I align the rotor to north when it is laying perpendicular to the ground? Should it be aligned to true north or magnetic north?
- How to adequately space the lower legs at exactly 48' between legs so that it can be attached to the base without problem when hoisted in the air by a crane?
- What about the approval process needed in the Town of Grand Chute?
- Can I get this all accomplished before winter sets in?
- How can I include considerations for long-term maintenance?
- AND, will the tower come crashing down when I smash the champagne bottle against it?
Were you able to read & concentrate on those 30 questions?? Just think, that is what I had to carefully consider during the many months of planning.
Approval Process
For anyone living in the town of Grand Chute, there is a special approval process. I expected simply to submit a building permit for approval, but since the installation was over 30', it was necessary to go through their exception approval process.
That meant I needed to account for the extra time and expense for a review by the Planning Commission and then the Grand Chute town board. And since the Board had questions, it required another round with both bodies.
Jon AB9NN was exceptionally helpful to me. He attended these hearings and did a fantastic job testifying.
I learned a number of things during this time that I would have not otherwise discovered:
- The professional staff at Grand Chute were supportive and did an outstanding job with their work.
- One of the questions was community support for my tower. A next door neighbor suggested a petition. She took that around to neighbors whose property was adjacent or a lot removed from my QTH. The support was unanimous with 13 people signing.
- Environmental aesthetics was a question. I subsequently visited eight locations in the Appleton, Darboy, Neenah & Hortonville areas and demonstrated that my installation could be deemed best-in-class in this regard.
- A distant neighbor had concern about radiation. While I knew the setup would be safe, I researched this with the aid of FCC guidance and found that when transmitting 500 watts continuous duty on 20 meters, my most common & generally most powerful transmissions, any citizen would be safe as long as they were at least 16' from the antenna. Now to get that close would require someone to climb up my tower to a height of 35' while I was transmitting, and that would be difficult to do because several of the climbing step-bolts will be removed after the tower is erect.
Finally, approval came after this 2 1/2 month process and it was time to order the materials and schedule time for the Boldt Company, a leading construction firm in the area, to begin the work of installing the tower sub-structure.
Construction Time
So let's now take a picture tour of the construction process.
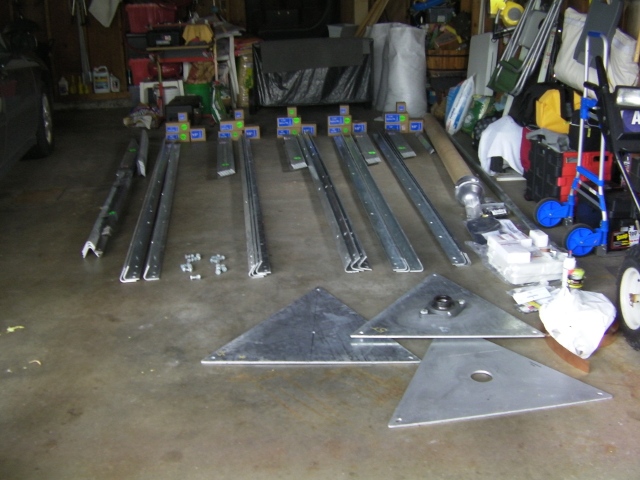
The AN Wireless tower was delivered by Old Dominion in fully knocked-down form. That made it easy to carry each part by hand from the semi to the garage where I stored until that item was needed in the construction process.

|
|
The first order of business was to lay out the components for the sub-structure. Wayne KC9RKT was extremely helpful in providing his expertise as we began step #1: Assembly of this portion that would be forever buried underground.
|
|
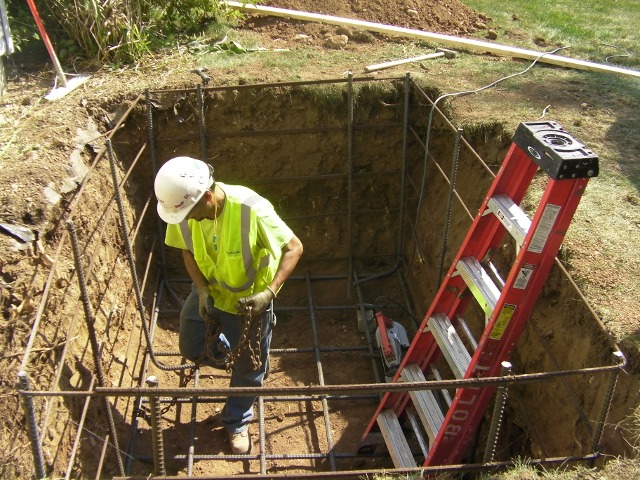
Three workers from Boldt arrived on a Friday morning at 7 am to begin the sub-structure work. Here is the beginning of the excavation for the 6' x 10' hole some 6 feet deep.
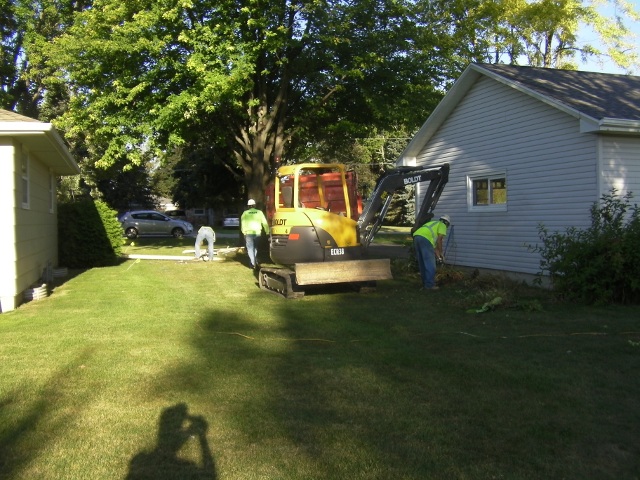
|
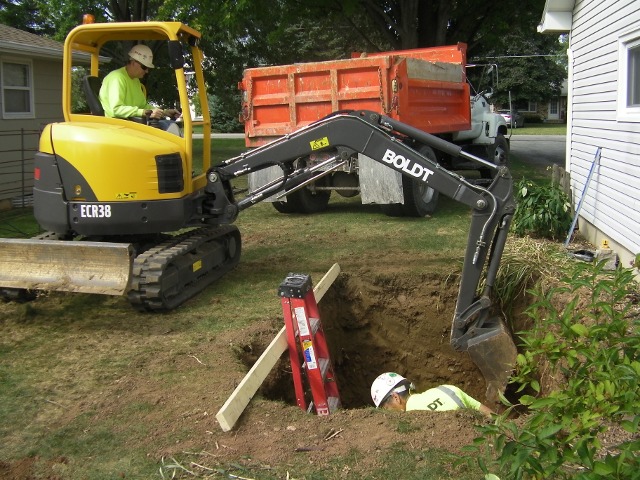
|
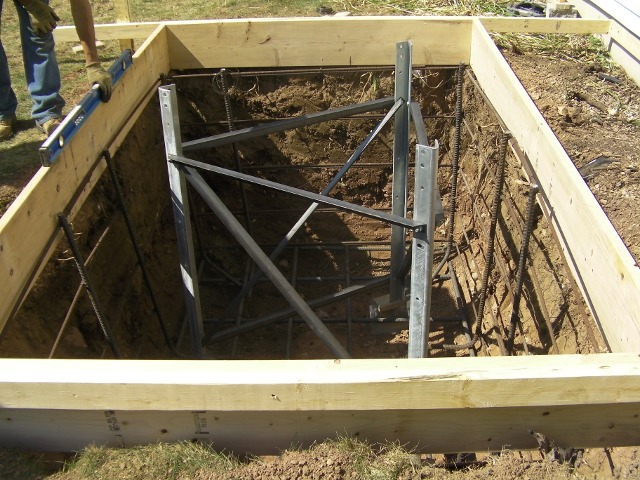
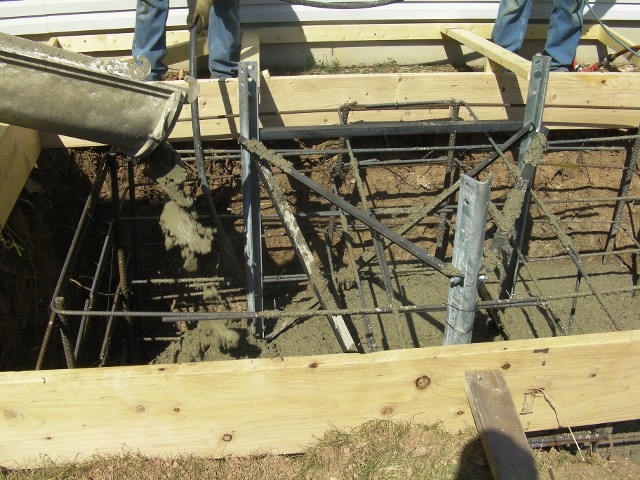
Rebar needed to be inserted in the bottom and sides, and later in the very top after the concrete was poured. Then our substructure was installed and trued up.
|
|
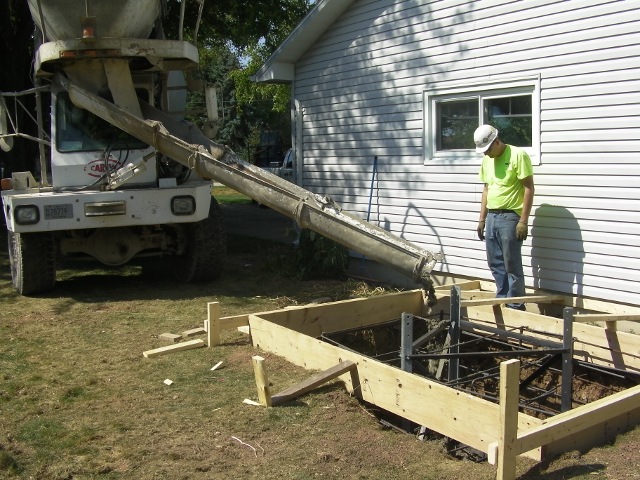
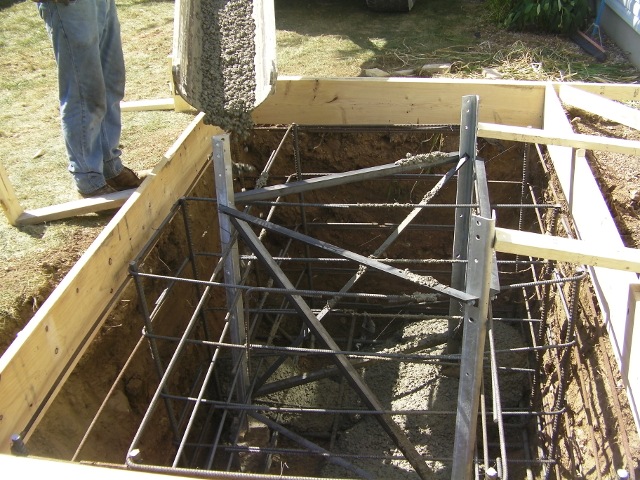
Then the cement truck came and 16 cubic yards of concrete was poured into the hole.
|
|
|
|
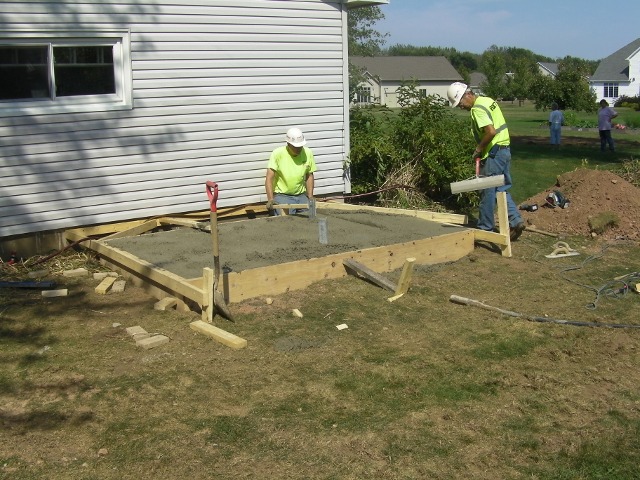
The crew worked from 7 am until 4 pm and this is what they had to show for their efforts! On Monday the foreman returned and worked for another hour to remove the wooden forms and clean up. Now I needed to let the concrete cure for 30 days before proceeding to the next step: erecting the tower.
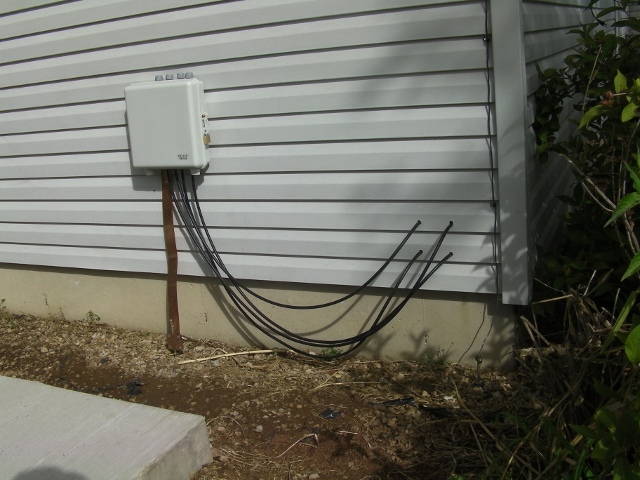
While waiting for that day I could at least install the four coax lightening arrestors and the cable lightning arrestor. Shown here are the antenna cables which have each been routed 105' from this outside box to Alpha Delpha antenna switches in my ham shack on the opposite side of my house.

|
|
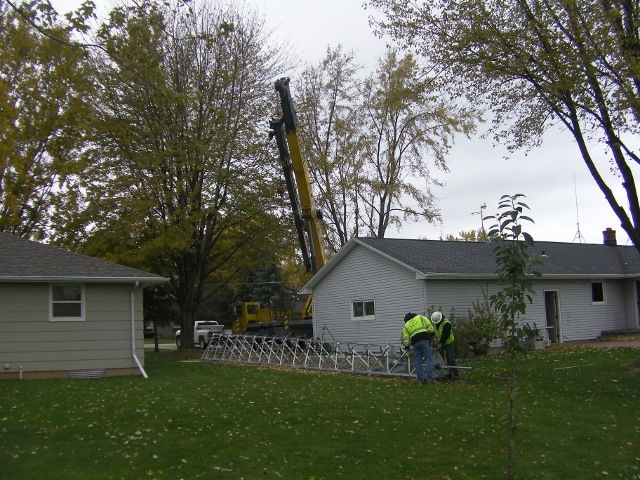
Once October came around, my Force 12 Yagi arrived after about an 8-week wait for manufacturing and the concrete had cured. It was now time to begin assembling my one-ton 'erector set.'
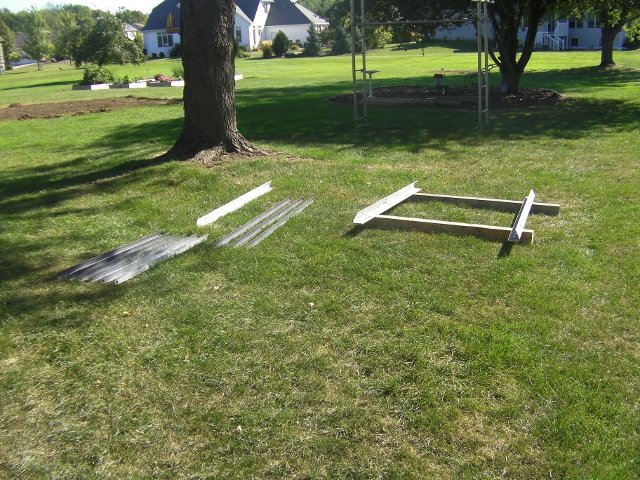
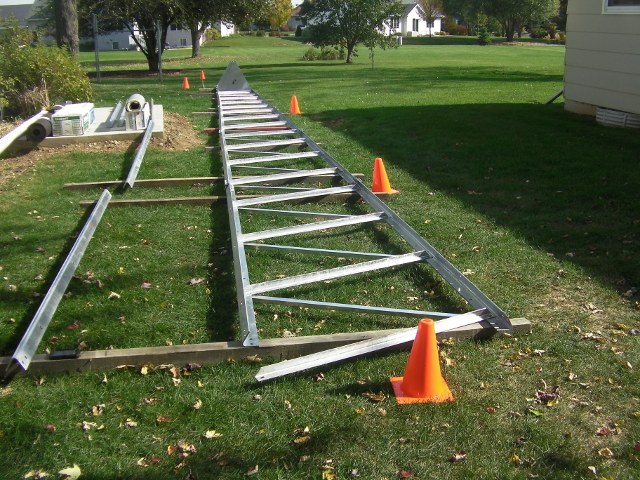
First I laid out five sections of legs on top of 4"x4" wooden supports. That was necessary so that I could tighten all the bolts on the bottom side. Then I inserted the crossing sections to support & strengthen the tower. At this point all bolts were simply finger tightened. That was important for subsequent alignments.
The most important lesson at this point is to "make your mistakes early, and then not often thereafter!"
|
|
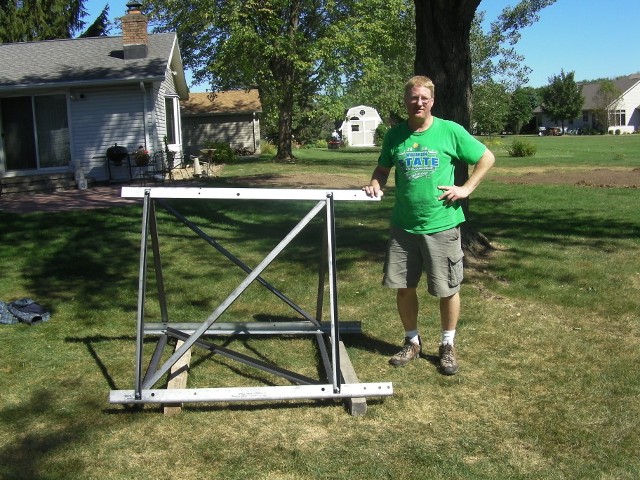
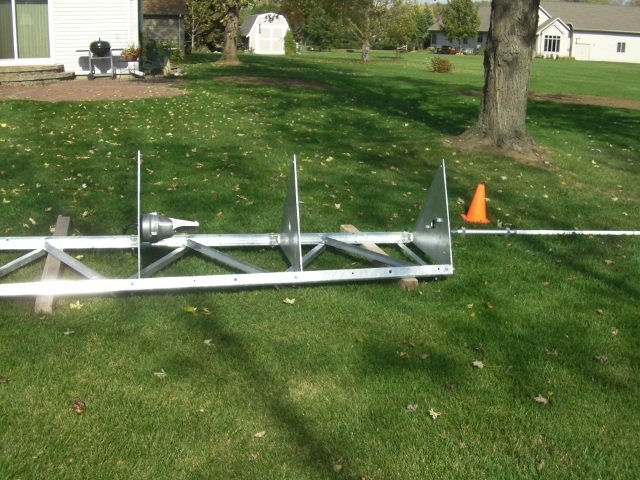
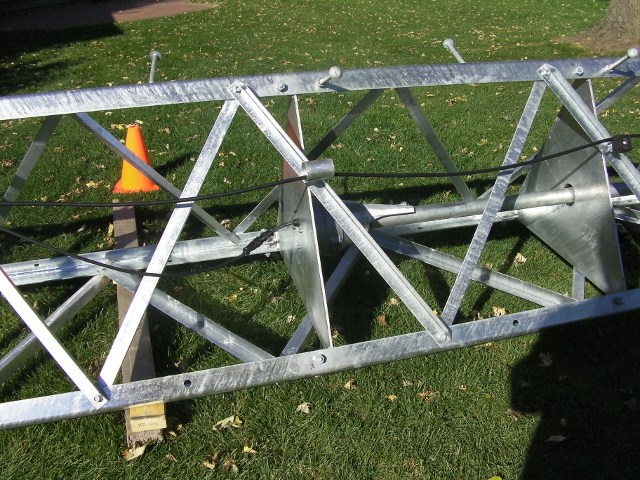
Then I inserted the three rotor plates and I begin building the spine of the third leg from the top of the tower down.
It took me about 10 hours to reach this point in construction. There was still a lot more to do, including the installation of the rotor, cables, double bazooka dipole antennas and alignment of the tower in many ways, eg, exactly 48" between bottom legs, straightening the 50' of legs and aligning the tower along the ground to account for gradual narrowing of the tower from bottom to top.
As alignment was completed, the bolts were first snug tightened and then torqued, with the 1/2" bolts torqued to 50 foot-pounds and the 3/8" bolts to 35 foot-pounds.
|

|
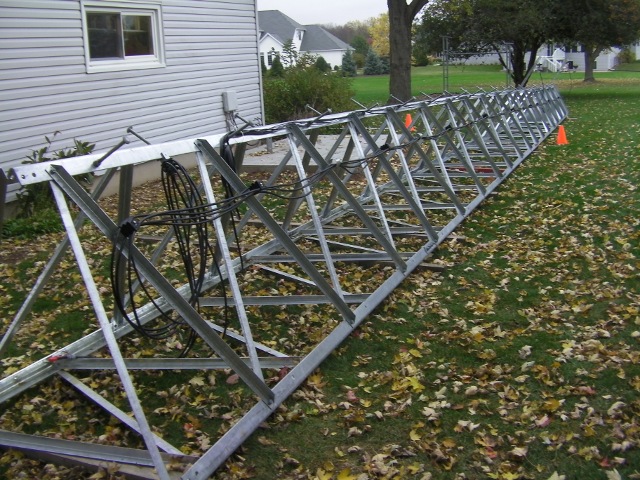
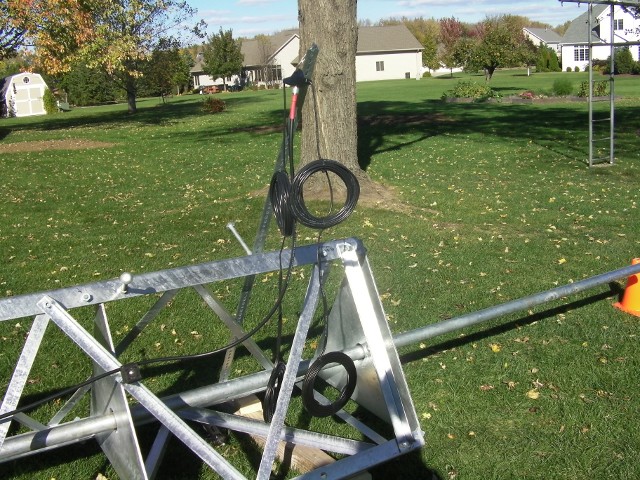
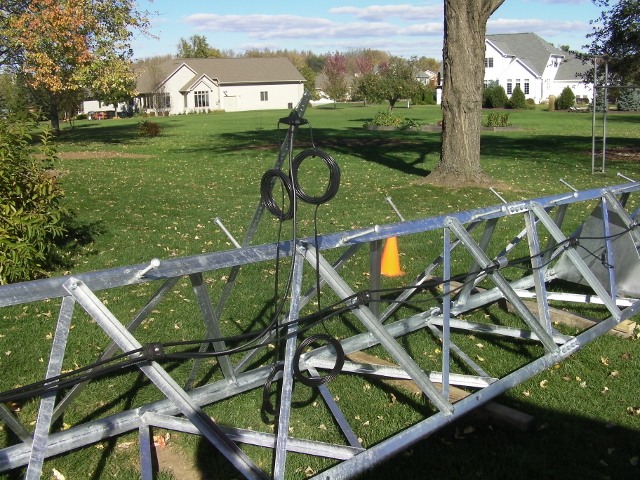
Next you can see the installation of the rotor and cables. When the tower is completed, there will be five cables. Four for antennas and one for the rotor. I used special UV resistent cable clamps to provide strain relief along the tower. I stacked as many as three as you'll see near the bottom to provide for the five cables. Also, I alternated with aluminium cable guides, as you'll notice in the left-hand picture.
|
|
Two of the antennas are double bazooka dipoles, a late addition to the design which I decided upon after a recommendation from Gary KB9AIT. Double bazookas offer wide bandwidth and relative low noise pickup.
The 75 meter antenna is mounted at 48' and the 40 meter is at 35'. These are designed to slope downward as an inverted-V, and they will be attached at the ends to trees.
|
|
Then I was ready to begin work to construct the Force 12 Yagi. This required POP riveting. I had never riveted in my life. Again, Wayne KC9RKT provided invaluable guidance and he taught me how to successfully install POP rivets. That was fun!
I placed all the parts for this seven element 20-15-10 meter Yagi in my garage, and then began riveting. Here I am riveting the 20 meter driven element.

|
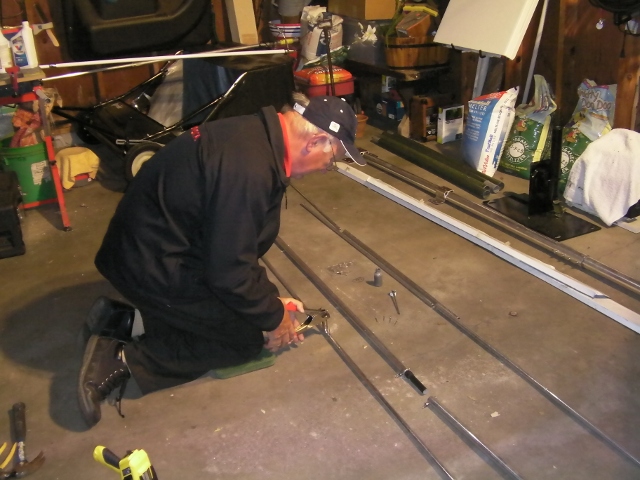
|
It took about a couple hours to do the POP riveting and other part-by-part assembly. I then worked outside for another three hours to assemble all pieces into one complete antenna. My biggest surprise was the length of the 20 meter reflector. I had not anticipated it to be 37'. That's much longer than I was expecting.
The antenna only weighs 38 pounds and it was very easy to balance on my shoulder. With it resting on my shoulder, I performed a preliminary resonance test and it checked out nicely at this low height!
I then proped it next to my house until the day came for tower erection and antenna installation.
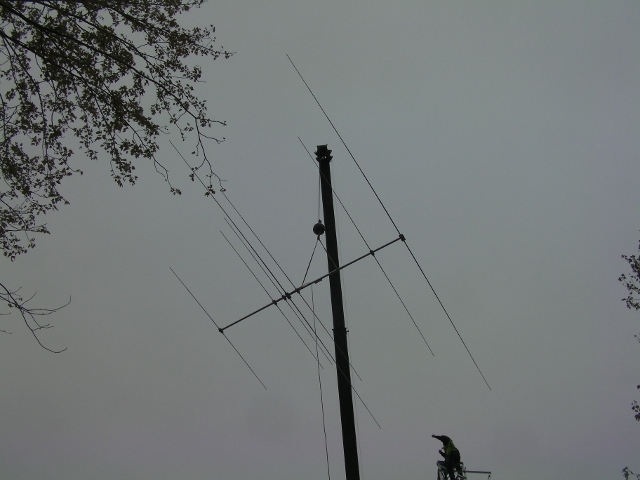
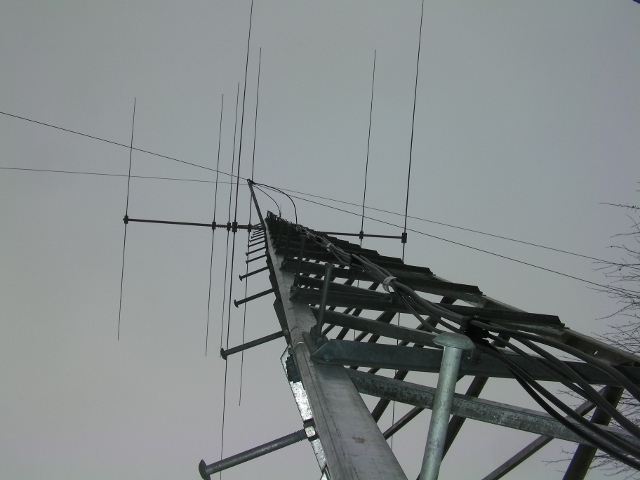
You can just make out the Diamond 2M/70cm vertical in front of the Yagi. This 23' antenna will be mounted a foot above the Yagi, bringing the total installation height to 75'.
|
Erecting Tower & Antennas
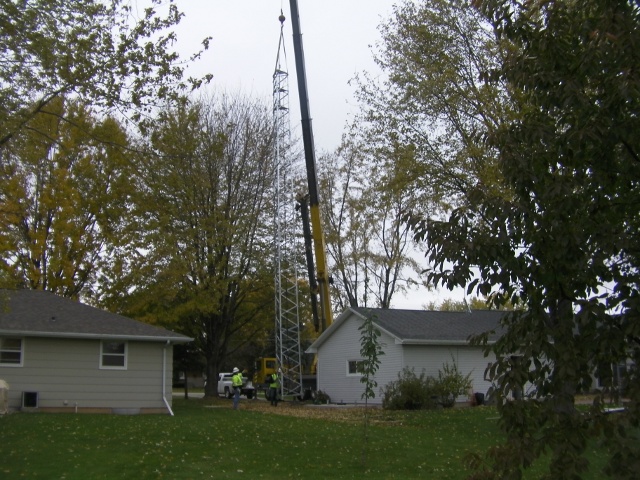
Following 10 months of planning, feasibility studies, town approval, materials acquisition and construction, the day finally arrived to erect the tower and install the antennas on top. We had a good day. No precipitation. No wind to bother us.
Bert Schmitz and the guys from Boldt Construction did a fantastic, professional job!! This, of course, was the big moment and in just 2 1/2 hours they were done. Interesting how the most visible aspect of the project took only about 1% of the total project time to complete!
The crane arrived on time, and I helped him position it in the driveway. There were two main issues to be concerned with. 1) Would this vehicle crush my asphalt drive? 2) Could he get the crane in position over the house roof and under the maple trees? No problem on both counts.
So then I was left with apprehension that morning about other significant matters:
- Would we be able to lift the tower safely? With a one-ton object in the air, any slip would be a disaster.
- Would the tripod readily fit to the foundation base? The specification was 48" between legs with 1/16" tolerance.
- Did I make any mistakes on the ground which wouldn't be apparant until the antennas were installed? Eg, bad rotor alignment. Antennas which wouldn't resonate for some reason.
- With the 37' 20 meter reflector, would there be enough room to rotate the beam without clipping any branches?
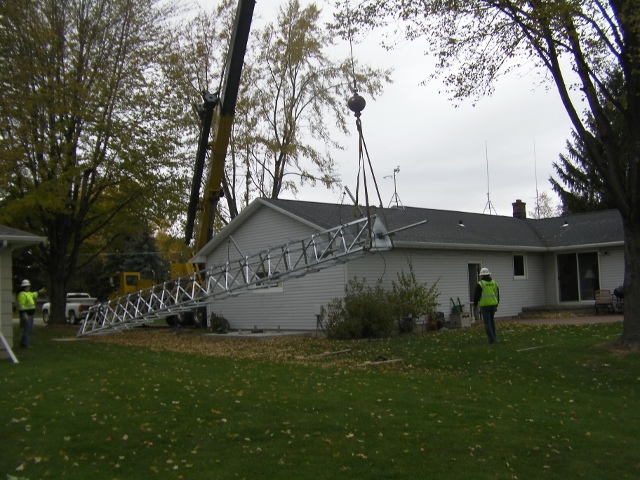
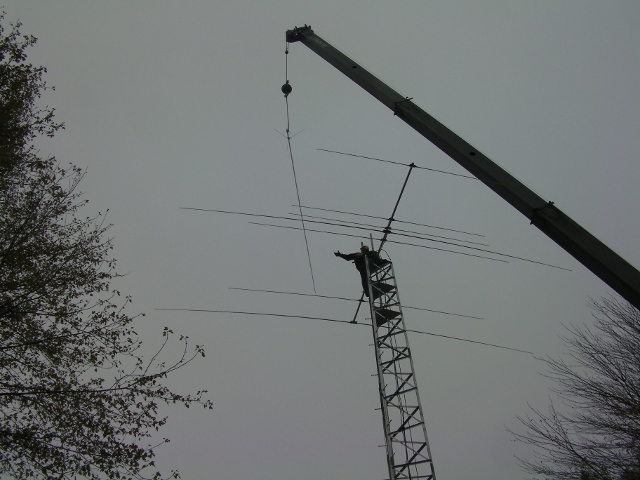
All went well. Friends showed up during the morning to witness the event with my wife, as I worked along side the crew with installation and some preliminary testing. So as Ken Kraus, Bernie Schmitt, Jim Larsen and Wayne Klein KC9RKT observed at different times with my wife, Jan, they saw first the tower raised upright and then positioned so that 27 bolts could be inserted to connect the bottom of the tower to the tripod stubs that were cemented two months before into the sub-structure.
|
|
|
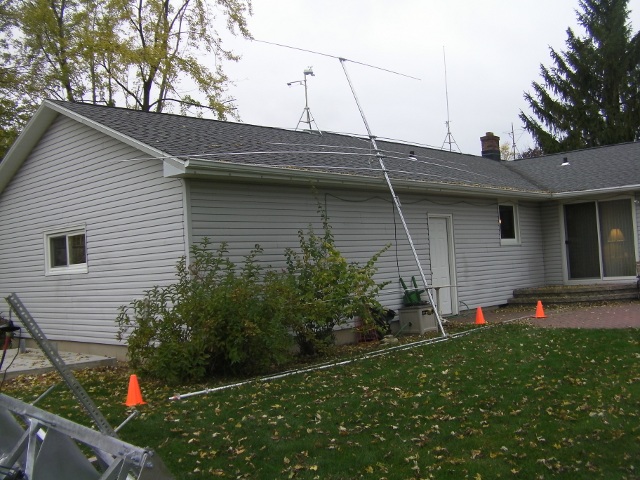
Next it was time for Bert to climb the 50' tower and install the antennas. We decided to install the Force 12 Yagi, followed by the Diamond vertical. After he was done, Bert then threaded one remaining coax cable down the tower and tightened the stress relief clamps.
|
|
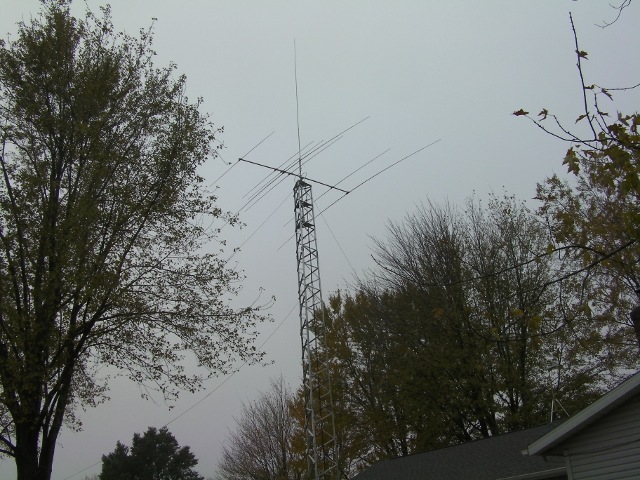
The Finished Product
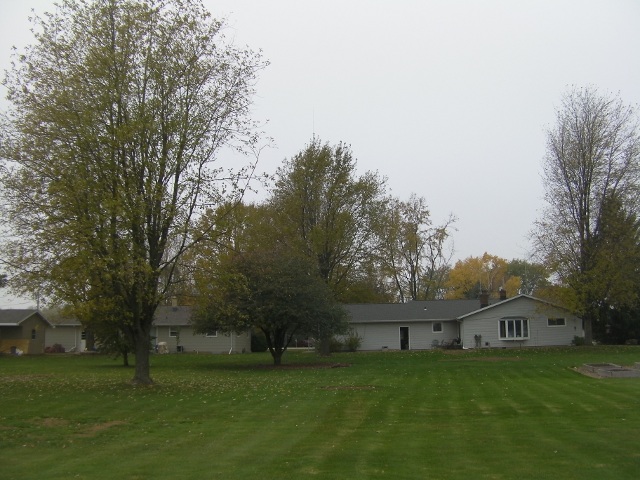
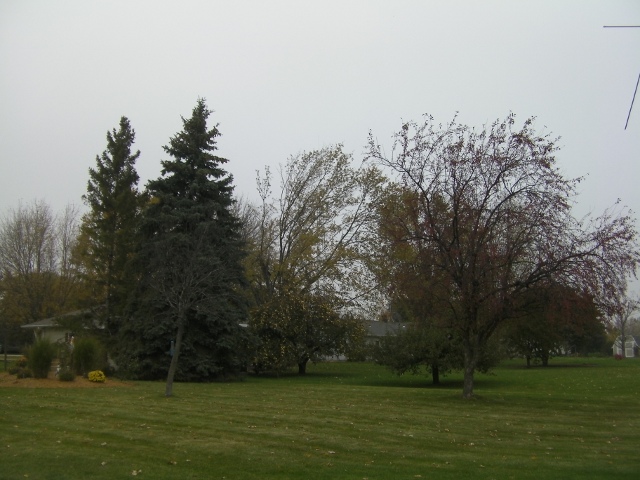
Recall that this design is quite neighborhood friendly. I took pictures to illustrate from my driveway and from the back of my yard.

|
|
During the approval process, there was one neighbor from a distance who regularly raised concern at town Planning Commission and Board meetings through her testimony. Understandably, some people just don't like the look of a tower, notwithstanding that nearby neighbors unanimously supported the project.
I took photos from the far corner of her lot (left photo) and a view from the direction of her patio to demonstrate just how friendly I maintained this installation would be for this family.
|

|
OK, OK, you didn't get this far NOT to see the tower, so here it is from more observable angles, including from a more acute angle in my back yard, at the corner of Capitol Drive & Casaloma Drive as one approaches by car, from directly behind my house, and lastly, looking directly up.

|

|
|
|
The Results
Does it work? Recall my objective at the beginning of this article: to enhance my receive ability.
The first step is to be sure the antennas resonate on frequency. That is measured by the Standing Wave Ratio (SWR) with 1.0 to 1 being perfect. 2.0 to 1 is acceptable and often one uses an antenna tuner to then match the transmitter to the antenna & feedline.
Resonance tests were considerably better than I anticipated, with SWR readings typically of 1.1 to 1 at resonance and often rising to only 1.2 to 1 at the band edges for most observations on the 75, 40, 20, 15, 10 and 2 meter bands.
I am a member of the YL System (#16824). I checked in, and quickly two stations called me for a contact and signal report. WK8Y (#16843) in Virginia gave me S9+20 dB. Then off the side of my beam, K5PCS (#16848) from Texas reported S9+15 dB. Those reports were quite pleasing.
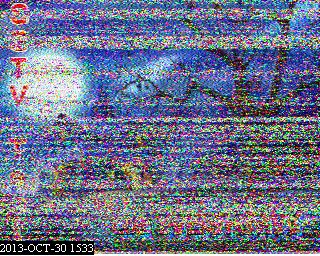
Next I examined the receive capability of the Force 12 Yagi, with particular interest on a band I work often: 20 meters. I tuned to 14.230 MHz where I could get a steady SSTV signal and copied K4DXL from Florida.
With my beam pointed in his direction, the S-meter reading was S8. It dropped to S6 when the antenna was pointed in the opposite direction. I then switched to the Isotron 20, an antenna I had previously used. The signal came in S5.
Each one point increase in S-unit is 6 decibles, or a four-fold increase in signal strength, so an increase from S5 to S8 is quite substantial.
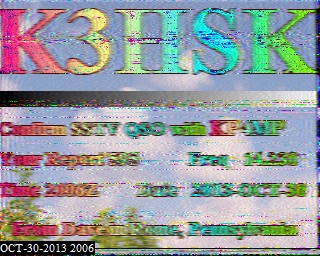
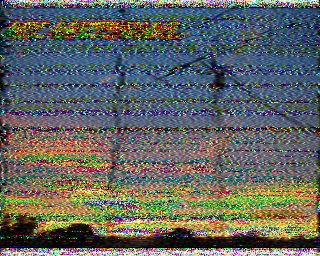
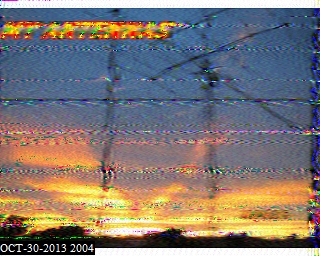
Next I tested a moderate signal on an SSTV QSO between hams in Pennsylvania (K3HSK) and Puerto Rico (KP4MP). Below are side-by-side comparisons between my previous receive capability and the new Yagi.

|
|
|
|
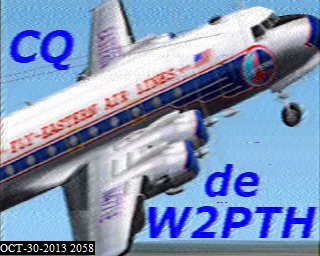
My good friend and SSTV mentor, Stu W2PTH, has a particularly powerful SSTV signal from New Jersey. In copying him, the S-meter reading jumps from S9+10dB to S9+30dB when I switch between my Isotron 20 and the Force 12 C-3 Yagi. That's pretty good considering he is working a ham in Spain and has his Mosely beam pointed away from me.
|

|
Soon after Stu finished his QSO, he called CQ and I was fortunate enough to contact him quite appropriately for my very 1st SSTV QSO using the Force 12 beam.
Stu gave me a fantastic signal report. He is very familiar with his rig of 13 years, and said he rarely hears a signal on 20 meters as strong as mine. At one point during our SSB QSO, he said I was 40 dB over S9!!! Wow.
Here is the CQ I received from Stu and then his reply transmission and signal report (tongue-in-cheek) back to me.
|

|
Then we went on to test my two antennas. At that time, my Isotron 20 produced an S9 signal strength and the Force 12 C-3 indicated S9+20 dB. Here are the comparative pictures which Stu received from me. The graphics and words from this analog transmission are much more distinct with the new antenna.

|

|
My 3rd SSTV QSO of the day occurred in the evening with Dutch KYØR from Pueblo, CO. He is a great ham with a great signal. Dutch was well aware of my tower project, so we talked for quite a while. He concluded with the following 73 picture, in 3-D. You would need special red-blue 3D glasses to fully enjoy the beauty of his Corvette!

|
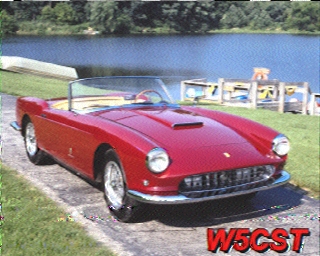
Leave it to Johann W5CST ("color slowscan TV") who has been into SSTV since 1968. He reported in a recent QSO that my SSB voice peaks were hitting S9+60 dB on his S-meter. And here we thought only those "big Texas rigs" had a loud signal. Ha!! Here is a solid SSTV transmission from Johann.
|
|
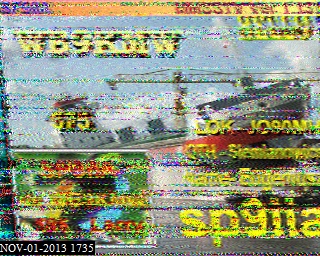
I performed three SSTV transmission tests using the SSTV cam from K6HR in California. I never seem to be received well by California stations, and with the test being in the morning, this was an even more strenuous test than normal.
I first transmitted with the Isotron 20 using 30 watts. Then I pointed my Force 12 towards California and retransmitted. Finally, I used the beam at 500 watts to observe the result, as all seen below.
|

|

|
My friend, Johann W5CST, asked me what my Effective Radiated Power (ERP) was during a QSO on 20 meters. I didn't know offhand, so I performed some calculations, with the aid of measurement tools found in the L&M (Links & Measurements) section of my ham web site, to determine the answer.
My calculations are as follows:
- Force 12 C-3 gain of 12.6 dBi
- CXP1318 cable attenuation for 160' of 0.85 dB
- Insertion losses from Polyphaser lightning protector & Alpha Delta coax switch of 0.25 dB
- This leads to a net theoretical gain of 11.5 dB
- That would provide an ERP of my 500 watts PEP transmission of 7,063 watts ERP in the direction of my beam heading
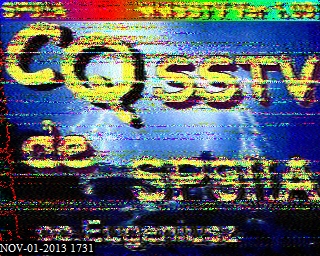
Perhaps the best testimonial to the Force 12 C-3 Yagi came from a signal I received from SP9IIA, a ham in Poland who was in an SSTV QSO with a ham in France.
Most amazing was that my station was the only North American SSTV cam of 14 stations I continuously monitor that received this signal!!

|
An hour later I had time from my busy daily schedule to respond to his CQ. Eugeniusz replied and gave me a solid 575 signal report from my Slow Scan TV transmission. He lives 4,590 miles from my QTH.
|
|
Before I put up the tower & Force 12 antenna, I would often remark that it was sort of embarrassing to send out a CQ call, get a reply from a ham in the Ukraine, for example, and I COULD NOT hear him!
Now it's a bit embarrassing to be chased for my contact. I get calls without even trying from hams in Spain, the Netherlands and Canada! Ha. And one I worked in Nova Scotia gave me a 595+ signal report. That's a rare report to receive.


Finally, moving away from the 20 meter High Frequency (HF) band, I took a look at my new Diamond X-700HNA VHF vertical antenna at 75'.
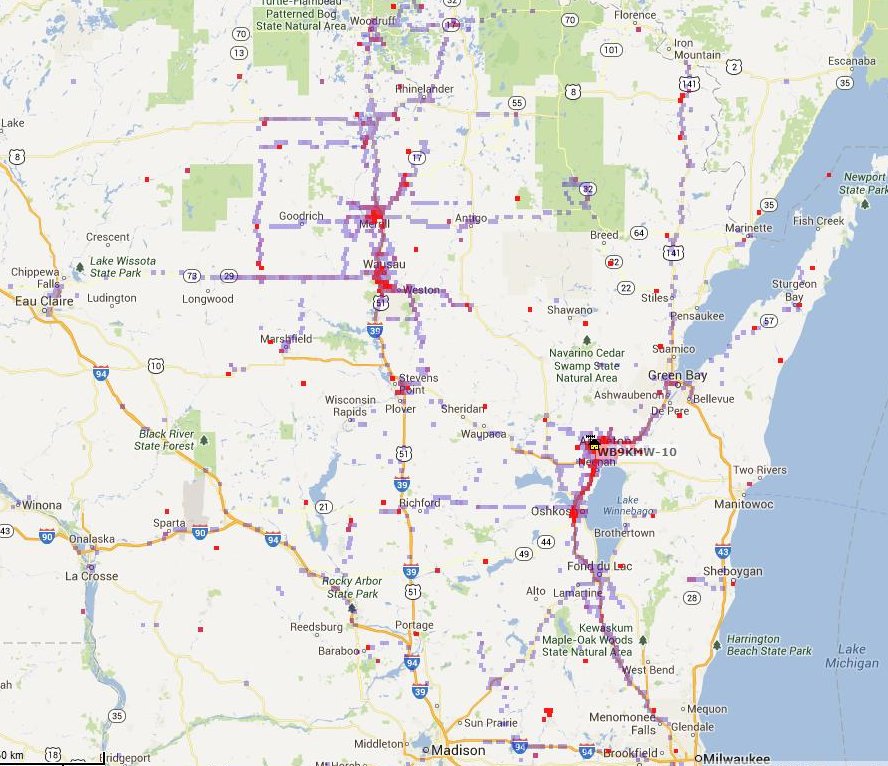
On a broad basis, I observe the number of APRS signals that I gate per hour. Previously I was gating some 15-50 signals to aprs.fi and now it is often 25-125 signals gated.
In an initial day of operation, I gated over 1,400 APRS packets. I notice that the coverage area is quite wider than my previous setup. I am now gating signals way over by LaCrosse, WI. That is a sizeable leap from previous coverage. In the map below, red denotes signals the areas gated quite often from those locations.
After the first full month of operation in November, 2013, I counted the number of position packets directly heard, as reported by aprs.fi, and it totalled 32,720. My number count in September when I was exclusively using the alternate Diamond X-300NA vertical was 15,613. So I posted a 110% improvement in performace on this dimension.
An important function of this antenna is ARES emergency work when the need calls for an outstanding antenna that can easily reach stations a county or more away from my QTH.